


PIERCING 101
EAR PIERCING PROCEDURE & AFTERCARE
An ear piercing takes seconds. Healing it right takes months.
What you do in between, or don't do, is what separates a smooth ear piercing aftercare routine from a complicated one. Whether this is your first piercing or you're adding to your collection with a future piercing, here's exactly how a professional piercing procedure works and what real aftercare looks like, step by step.
Overview of the Ear piercing Procedure & AFtercare
- Procedure duration: A few minutes, using sterilized, single-use needles and equipment
- Healing time range: 2 months to a year, depending on the piercing location
- Aftercare frequency: Clean twice daily with saline solution
- Never use on a healing piercing: Alcohol, hydrogen peroxide, or antibacterial soap
- What to avoid most: Changing jewelry before the piercing is fully healed
Quick Links:
Piercing Procedure | Healing Time | Aftercare | Full Guides by Placement
EAR PIERCINGS PROCEDURE

Wondering what actually happens during an ear piercing appointment? A professional ear piercing procedure follows a precise sequence designed to minimize infection risk and discomfort from the moment you sit down. Here's what to expect, step by step:
- Consultation and anatomy check. Before anything else, the piercer talks through your placement choice and checks that your anatomy actually suits it. Not every ear can safely accommodate every piercing, so this step confirms you're both on the same page before moving forward.
- Jewelry selection. If you haven't already chosen your jewelry, you'll select it now. Your starter piece needs to be sterilized and ready to insert immediately after the needle passes through, so this happens before any cleaning or marking begins.
- ID and consent check, if applicable. For certain placements or for minors, the piercer may confirm identification and parental consent before proceeding, depending on the studio's policy and local regulations.
- Sterilization of equipment. The piercer opens sterilized, single-use needles and equipment in front of you, ensuring impeccable hygiene and confirming nothing has been reused.
- Protection and hygiene. The piercer puts on a new pair of disposable gloves immediately before touching your ear, to avoid any contamination.
- Ear cleaning. Your ear is thoroughly cleaned with an antiseptic solution to remove any impurities from the skin before the needle ever touches it.
- Marking the placement. The piercer marks the exact spot where the piercing will go, often asking you to check it in a mirror first, so you can confirm the position and angle before anything is permanent.
- Piercing and jewelry insertion. The needle creates the hole in a single, quick motion, immediately followed by the insertion of your chosen jewelry.
- Aftercare walkthrough. Once the jewelry is in, the piercer talks you through how to clean and care for your new piercing, what to avoid, and what's normal to expect in the coming days, before you leave the studio.
The entire process is carried out quickly, usually within a few minutes for the piercing itself, but with great precision at every step, to minimize discomfort and set the piercing up for optimal healing from the very first moment. If anything about these steps looks different at your appointment, such as a piercer skipping gloves, reusing equipment, or not checking your anatomy first, that's a sign to ask questions or choose a different studio.
EAR PIERCING HEALING TIME

The healing time for ear piercings varies depending on the pierced area and individual factors such as overall health and aftercare. Generally, ear piercings can be classified into three healing time groups:
- 2 to 4 months: Lobe piercings
- 6 to 12 months: Thinner cartilage piercings
- 9 to 12 months: Complex areas like daith and antitragus piercings
Factors Affecting Healing:
- Location. Cartilage has far less blood supply than the soft tissue of the lobe, and blood flow delivers the nutrients and immune cells that drive healing, which is why cartilage piercings consistently take longer than lobe piercings.
- Diet. Nutrients like protein, zinc, and vitamin C support tissue repair, so a balanced diet gives your body what it needs to rebuild skin and cartilage efficiently.
- Overall health. Conditions that affect circulation or immune response, along with habits like smoking, can slow healing by limiting how efficiently the body repairs the piercing site.
- Genetics. Some people naturally form scar tissue more readily or heal faster than others, which is why healing time can vary even between two people with the same piercing and the same aftercare routine.
- Aftercare. Consistent, gentle cleaning prevents infection and irritation, both of which can significantly delay healing if left unaddressed.
Tips:
- Do not change your jewelry until the piercing is fully healed.
- If a jewelry change is necessary, have it done by a professional piercer.
- Regularly monitor the piercing for signs of infection (redness, swelling, discharge). If symptoms occur, consult a professional.
EAR PIERCINGS AFTERCARE ADVICE

Proper ear piercing aftercare is what actually determines whether your piercing heals smoothly or runs into complications, far more than the piercing procedure itself.
How to Clean Your Piercing
- Clean twice a day. Clean your piercing in the morning and evening with a saline solution to prevent infection and support healing. More frequent cleaning doesn't speed things up, it can actually irritate the skin and set healing back.
- Gentle cleaning technique.
Use a sterile, non-woven gauze or swab soaked in saline solution, rather than cotton, which can leave tiny fibers behind that catch on the jewelry. Carefully clean around both sides of the piercing, and avoid rotating the jewelry while cleaning. - Let crust soften naturally. Never pick or scrape at dried discharge. Let saline solution soften it during cleaning instead, since picking at crust can cause micro-tears and reopen the piercing.
- Keep it dry. After cleaning, gently pat the area dry with a clean, disposable paper towel rather than a fabric towel, which can harbor bacteria. Moisture left sitting on a healing piercing creates an environment where bacteria multiply more easily, and it can soften the surrounding skin, making it more prone to irritation.
- Check the jewelry, don't play with it. Ensure the jewelry is secure, but avoid unnecessary manipulation or touching beyond what cleaning requires.
Saline solution is the standard. It remains the best, safest option for cleaning any healing piercing.
What to Avoid During Healing
- Avoid harsh chemicals entirely. Do not use alcohol, hydrogen peroxide, or antibacterial soaps, as these can irritate the piercing and dry out healing skin.
- Only touch it with clean hands. Bacteria from unwashed hands is one of the most common, and most avoidable, causes of piercing infection.
- Stay out of pools, hot tubs, lakes, and oceans during the initial healing period, since these environments harbor bacteria and other organisms that can cause infection.
- Keep hair spray, perfume, and lotion away from the piercing site, since these products can irritate healing skin or clog the piercing.
- Avoid sleeping on the pierced ear to prevent pressure and irritation that can slow healing.
- Avoid tight clothing, hats, or headphones that press or rub against the piercing, since repeated friction is a common, often overlooked cause of delayed healing.
- Choose hypoallergenic jewelry from the start. Nickel-free materials like 18k gold reduce the risk of irritation and allergic reaction during healing, which matters just as much as how you clean it.
Signs of Infection: What to Watch For
Mild redness, light swelling, and clear or slightly yellowish discharge are normal in the first few weeks. The following signs are different and may indicate infection:
- Redness that spreads or worsens instead of improving
- Increasing pain or heat around the piercing
- Yellow, green, or foul-smelling discharge
- Significant swelling
- Fever or feeling generally unwell
If you notice these signs, do not remove the jewelry, since this can trap the infection inside. Clean the area with saline solution and contact your piercer or a doctor if symptoms persist or worsen.
Many piercers also recommend a follow-up check within the first few weeks, so ask about this when booking your appointment.
EAR PIERCINGS FULL GUIDE
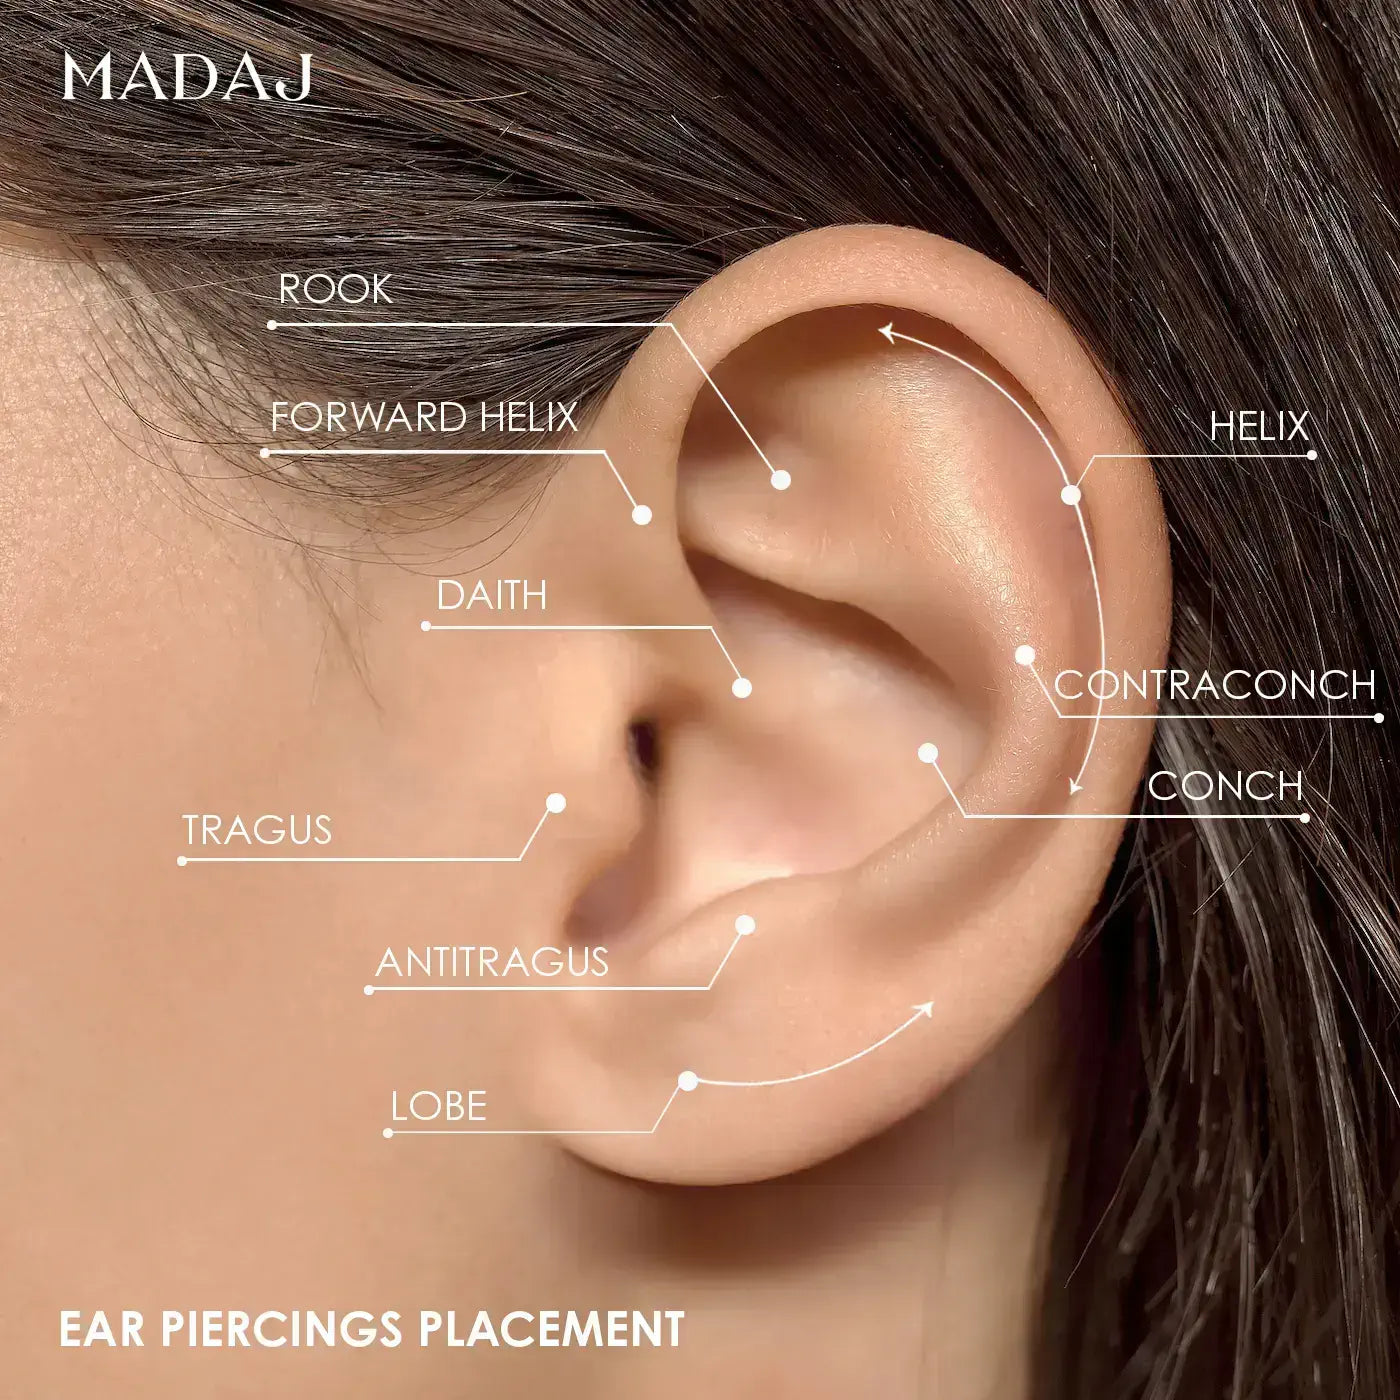
If you would like to learn more about a specific area of the ear, check out our detailed guides by ear area for complete information. Here are the available guides: